| 일 | 월 | 화 | 수 | 목 | 금 | 토 |
|---|---|---|---|---|---|---|
| 1 | 2 | 3 | 4 | 5 | 6 | |
| 7 | 8 | 9 | 10 | 11 | 12 | 13 |
| 14 | 15 | 16 | 17 | 18 | 19 | 20 |
| 21 | 22 | 23 | 24 | 25 | 26 | 27 |
| 28 | 29 | 30 | 31 |
- Recsys-KR
- DilatedNet
- DFS
- hackerrank
- 큐
- MySQL
- Segmentation
- Python
- 튜토리얼
- Semantic Segmentation
- 나는 리뷰어다
- 코딩테스트
- Image Segmentation
- 입문
- 3줄 논문
- 스택
- TEAM-EDA
- eda
- 나는리뷰어다
- 엘리스
- 알고리즘
- 추천시스템
- TEAM EDA
- 프로그래머스
- 파이썬
- pytorch
- 한빛미디어
- 협업필터링
- Object Detection
- Machine Learning Advanced
- Today
- Total
TEAM EDA
[파이토치로 시작하는 딥러닝 기초] 1.5 Logistic Regression 본문
이번 글에서는 PyTorch로 Logistic Regression을 하는 방법에 대해서 배워보도록 하겠습니다. 이번 글은 EDWITH에서 진행하는 파이토치로 시작하는 딥러닝 기초를 토대로 작성하였습니다.
목차
- Reminder
- Computing Hypothesis
- Computing Cost Function
- Evaluation
- Higher Implementation
1. Reminder : Logistic Regression
- 목적 : 이진분류
- 방법 : 선형회귀식에 sigmoid를 씌워서 해결함
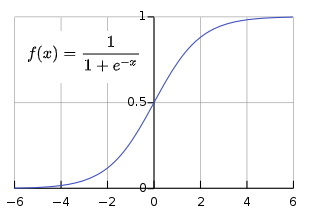
sigmoid란?
- 정의 : 시그모이드 함수는 실함수로써 유계이며 미분가능한 함수이며, 모든 점에서의 미분값은 양수이다.
- 성질 : 음의 무한대로 가면 0을 양의 무한대로 가면 1의 값을 가진다.

Logistic Regression은 위의 시그모이드 함수의 성질을 이용해서 선형 회귀값을 0~1(확률)으로 만들어준 회귀식입니다.

목적식과 비용함수는 위와 같이 정의 될 수 있습니다. 목적식은 위에서 말한대로 시그모이드 형태입니다. 차이점은 x자리에 선형회귀식의 결과가 들어왔다는 점만 차이가납니다.
비용함수의 경우 y값이 1인 경우와 0인 두가지의 경우를 더한 값입니다.

y가 1인 경우에는 ylog(H(x))밖에 값이 안생기고 y가 0인 경우에는 (1-y)(log(1-H(x))밖에 값이 생기지 않습니다. 이러한 성질을 이용해서 하나의 식에 두가지를 모두 표현한 것입니다.

그런데 여기서 log를 사용해준 이유가 있습니다. 그 이유는 sigmoid에서 지수 형태의 그래프를 사용했기에 그래프가 매우 꾸불꾸불한 형태입니다. 그러면 local minimum에 빠질 위험이 높고 이를 방지하기 위해 log 함수를 사용해서 펴주는 작업을 진행해주게 됩니다.
2. Computing Hypothesis
import torch
import torch.nn as nn
import torch.nn.functional as F
import torch.optim as optim

x_data = [[1, 2], [2, 3], [3, 1], [4, 3], [5, 3], [6, 2]]
y_data = [[0], [0], [0], [1], [1], [1]]

x_train = torch.FloatTensor(x_data)
y_train = torch.FloatTensor(y_data)
W = torch.zeros((2, 1), requires_grad=True)
b = torch.zeros(1, requires_grad=True)
# sigmoid함수는 직접구현하는 것보다는 내장되어있는 함수를 사용하는 게 좋습니다.
# 그 이유는 직접 만들다보면 분모가 0이 된다든지하는 예상치못한 오류가 발생하기 때문입니다.
# hypothesis = 1 / (1 + torch.exp(-(x_train.matmul(W) + b)))
hypothesis = torch.sigmoid(x_train.matmul(W) + b)3. Computing the Cost Function
# 방법1. low-level 직접 구현
losses = -(y_train * torch.log(hypothesis) +
           (1 - y_train) * torch.log(1 - hypothesis))
cost = losses.mean()
# 방법2. high-level : 패키지 사용
cost = F.binary_cross_entropy(hypothesis, y_train)4. Evaluation
위의 과정을 풀코드로 옮기면 아래와 같습니다.
# 모델 초기화
W = torch.zeros((2, 1), requires_grad=True)
b = torch.zeros(1, requires_grad=True)
# optimizer 설정
optimizer = optim.SGD([W, b], lr=1)

nb_epochs = 1000
for epoch in range(nb_epochs + 1):

    # Cost 계산
    hypothesis = torch.sigmoid(x_train.matmul(W) + b) # or .mm or @
    cost = F.binary_cross_entropy(hypothesis, y_train)

    # cost로 H(x) 개선
    optimizer.zero_grad()
    cost.backward()
    optimizer.step()

    # 100번마다 로그 출력
    if epoch % 100 == 0:
        print('Epoch {:4d}/{} Cost: {:.6f}'.format(
            epoch, nb_epochs, cost.item()
        ))
hypothesis = torch.sigmoid(x_train.matmul(W) + b)
print(hypothesis[:5])
# 0.5보다 크면 1로 그렇지 않으면 0으로 변환

prediction = hypothesis >= torch.FloatTensor([0.5])
print(prediction[:5])
print(prediction[:5])
print(y_train[:5])
# prediction과 y_train이 같으면 1 그렇지 않으면 0으로 변환

correct_prediction = prediction.float() == y_train
print(correct_prediction[:5])
accuracy = correct_prediction.sum().item() / len(correct_prediction)
print('The model has an accuracy of {:2.2f}% for the training set.'.format(accuracy * 100))
5. Higher Implementation
class BinaryClassifier(nn.Module):
    def __init__(self):
        super().__init__()
        self.linear = nn.Linear(8, 1)
        self.sigmoid = nn.Sigmoid()

    def forward(self, x):
        return self.sigmoid(self.linear(x))

model = BinaryClassifier()

# optimizer 설정
optimizer = optim.SGD(model.parameters(), lr=1)

nb_epochs = 100
for epoch in range(nb_epochs + 1):

    # H(x) 계산
    hypothesis = model(x_train)

    # cost 계산
    cost = F.binary_cross_entropy(hypothesis, y_train)

    # cost로 H(x) 개선
    optimizer.zero_grad()
    cost.backward()
    optimizer.step()

    # 20번마다 로그 출력
    if epoch % 10 == 0:
        prediction = hypothesis >= torch.FloatTensor([0.5])
        correct_prediction = prediction.float() == y_train
        accuracy = correct_prediction.sum().item() / len(correct_prediction)
        print('Epoch {:4d}/{} Cost: {:.6f} Accuracy {:2.2f}%'.format(
            epoch, nb_epochs, cost.item(), accuracy * 100,
        ))
'EDA Study > PyTorch' 카테고리의 다른 글
| [파이토치로 시작하는 딥러닝 기초] 2.1~2 Perceptron, Multi Layer Perceptron (0) | 2020.03.20 |
|---|---|
| [파이토치로 시작하는 딥러닝 기초] 1.6 Softmax Classification (0) | 2020.03.20 |
| [파이토치로 시작하는 딥러닝 기초] 1.4.2 Loading Data (0) | 2020.03.19 |
| [파이토치로 시작하는 딥러닝 기초] 1.2~4 Linear Regression (0) | 2020.03.19 |
| [파이토치로 시작하는 딥러닝 기초] 1.1 Tensor Manipulation (0) | 2020.03.19 |


